Friday, September 30, 2011

iPad2 case makeover

Oh my electronic gadgets its my weakness...well among other things in life haha. I did not get the original iPad i actually somehow gathered strength and waited for the iPad2! Right I know the 3 is probably around the corner. Doesn't matter I wanted it and I made it happen. If you want it, it will come. Its my motto. Goals people goals!!! So here I am with this super cool new toy but I needed to protect it. I went online looked at several cases, some of them over priced and ugly...some just plain ugly. What's a girl to do? Whala be CRAFTY! I actually found an online site that would custom color the case I want and they quoted me 2-4weeks. That seemed reasonable *sigh* fast forward 7weeks and countless emails to the production people and at 8weeks I FINALLY got my case.


First things first its a beautiful color but I had to add the vinyl....heck yes gotta put my initials on it!
But the interior lining was a complete grease attracting lining. When you have two kiddos with grubby hands yeah its not a good thing. I had to do something to the inside. Hello Martha Stewart and Michaels craft store with the 40% off coupons! Never buy something full price there, NEVER you hear me?? I bought the stencils, paint, brushes all with coupons and will reuse them again and again :) 


Stencils!!! love love love it. Took literally less than five minutes to finish it and than voila! 


Completely customized just for ME! And now you can't tell if there would be hand prints plus my handy hubby installed the protecting film cover over the actual screen as well. Super easy and you can do this to practically anything.


Tuesday, September 20, 2011

light organizing


One of the big that changes in your life after kids is your stuff. Now its your stuff + their stuff + plus stuff ya didn't even know you had. So you now have to find a new place for allllll this STUFF! Easy answer would be "just get rid of it" hmmmm easier said than done. I tackle crazy unorganized areas one corner at a time. Don't try to kill yourself and clean your house or reorganize an entire floor at once cause with two little monkies jumping around it just doesn't get done. Plus if you're like me at all you get easily distracted by some awesome forgotten treasures (which BTW best part of cleaning). So here are some areas that I recently hit up and changed around. Thank you Ikea for being a part of my life hahaha! So some tips to follow:
1. Pick a section to focus on. Don't over do it and pick the whole kitchen on your first attempt...cause that's kind of scary. Pick a section of cabinets instead of ALL of the kitchen or just the pantry.
2. Don't spend a ton of money buying containers (i.e. container store cause its a rip off) to make things pretty. Chances are you have these materials on hand or hello dollar store!!!
3. DRAG everything out of the space. The goal is to put back into the space the actual items you are going to need and use. If you haven't used it in a couple of years please do everyone a favor and toss it or donate it depending on the item.
4. Trash bags are your friend, keep one close by to help you be encouraged not to hoard. Remember no hoarding!!
5. And finally a picture helps you remember where everything went!


My makeup station at the top. I know its horrendous but it had been awhile since I touched it. I have two small children its hard to look mac-tastic everyday hahaha. Well that's my excuse and I'm sticking to it! It so badly needed to be reorganized so those hanging "jars" are displayed at ikea for like kitchen space. Hmm I look at it and say no thanks but its great for my makeup brushes! Voila it looks beautiful and off the table and away from grubby little hands!!


Girls with straight hair want curly hair and girls with curly hair want straight hair. Silly but its true. Alas it takes a lot of tools sometimes to make these things happen. My sink cabinet looks like it vomitted hair supplies everywhere. Graphic but true. It desperately needed some organization. I used all my extra tubs for other projects so I did purchase a tub from Ikea but all the little boxes I had on hand from previous *cough*ikea*cough* trips in texas.


In the end it looks a million times cleaner. While I may not whip out a curling Iron at the drop of a dime I also don't need it so often where that skill set would benefit me. The last picture that is one of the clear organizers for holding TEA packets but not any more. I used this baby for every day hair accessories aka hair ties and clippies. These short organizing tips have just helped me not feel so overwhelmed about disorganization. I love a clean house but I know that I can't kill myself over it. One day at a time, or section at a time. I hopefully can encourage someone else to better organize the small areas in their lives :)

Saturday, September 10, 2011

Regular Couponing...Extreme savings!


Yes that TV show Extreme Couponing has caused everyone to attempt to do the same. I say more power to you cause guess what SAVING MONEY is AWESOME!! I don't know about you but I don't have a money tree. I'm a mom and a wife and money can't be thrown away (hmmm much like I threw it away in my early 20's). So for awhile I've been saving money. I seldom buy things full price unless necessary...for example my iPad2 heehee. So since I need extra dough for stuff like that I save money in everyday items by using coupons. Let me CLARIFY I use ONE NEWSPAPER a weekend. Not 12, not dumpster diving....ONE! In one month on just everyday household items I kept a log on what I spent just to see how it is. People are quick to generalize "oh coupons are for junk food." So here it is couponing on 
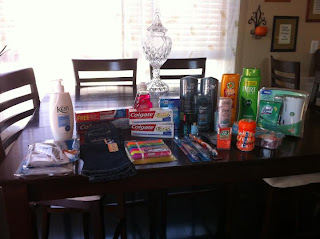
NON FOOD ITEMS!! Everything above was bought at either Walgreens or Target.

HERES the breakdown...

Dove men care bodywash retail $3.99 clearance $2.78 after BOGO coupon $1.34. (x2)
Dove men deodorant retail $2.99 sale $2.39 coupon $1off = 1.39
Dove women's deodorant retail $3.99 clearance $2.78 BOGO coupon $1.34
Pert plus retail $4.99 sale $3.99 RR -3 =99cents -1$ coupon = free
Revlon nail retail $4.99 sale $3.99 RR -3 =99cents -1$ coupon free (bought 2)
floss and tooth brush retail $2.99 each sale 2/5 RR -3 =2/2 -1.50 = 50cent for both
9month size Jeans retail $8.00 clearance $2.00 -$2 coupon = Free
Herbal essences shampoo retail $2.99 clearance $2.24 - 1$ = $1.24
Keri lotion retail $4.29 sale 3.99 RR -3 =99 - 2$ coupon + 1$$$ (MADE A DOLLAR)
Colgate toothpaste $2.74 sale 2.32 coupon -$1 =$1.32
Colgate toothpaste $2.50 each sale 2/4 RR $2 2/2 minus two $1 off = free (2 items)
Paper mate pens retail $1.49 sale 99 - target coupon $1 =free (2items)
Gain dish washing soap retail $1.78 sale 88 coupon -50cents = $0.38cents
Lysol touchless soap dispenser retail $11.99 RR 5$ -3coupon = $3 for entire system (a reg just refill costs 3.99)
3d crest white stripes retail $23 -$10 manufacture -$7 walgreen coupon =$6
Oral b toothbrush retail $1.99 2/2 sale coupon -2$ off 2 = Free. (2 items)
Venus razor retail $7.99 sale 6$ -RR 3 - 3 coupon = $1
Expo markers retail $4.39 sale $3.99 RR 3 =$1
Tictac retail $1.19 coupon -1$ = 19cents
Mentos retail $0.88cents - 1.00 =+12cents profit

Total retail = $117.11 Cost $19.92
Savings $97.19 PERCENTAGE SAVED %83.0

Sunday, September 4, 2011

Entertainment Center turned Play Kitchen


Photobucket


Summertime is coming to an end and every summer I always finish some DIY/re purpose project. Last summer I did a run down bench turned brand new and a run down picnic table turned perfect table for Ayden. This summer was finishing our daughters nursery and Ayden's play kitchen.

Ayden loves to play chef. Last year during a visit to my sister in Texas we went to Ikea and bought him all the pots and pans and felt foodies. He plays with those toys more than anything. Originally I thought oh I'll just get one of those used fisher price/little tikes play kitchen on craigslist or something. Um have you seen how much one of those things cost brand new and or used? Upwards of 50$ and more. That and they all look the same :/ not knocking anyone that has one but I had more in mind. Especially after seeing a couple of blogs with FANTASTIC entertainment stands turned into play kitchen. Remember back in the 90's when everyone had one. Well folks now its not good interior design so now it needs a new purpose a new life. I am not one to waste so hey I started checking craigslist every now and than in the FREE section. One day I saw a FREE one in the exact size/style I wanted and BEST of all it was disassembled meaning we could pack it into our small car whoohoo! It was meant to be! Below is the actual photo from the craigslist ad.

Photobucket


If you've read my blog before you know that I work at a pretty awesome place. Maybe not awesome to you but to me it is. I have some of the most awesome co-workers EVER. So I started telling them my ideas for this DIY play kitchen. Immediately they all wanted to pitch in and help. I had my friends husband cut the perfect hole for the sink. He also cut the hole for the oven see through door. The sink itself was a silver mixing bowl given to us by our good friend Jenn. See where I am going with this? Ask and it shall come!! The before....

Photobucket


I worked on it slowly. I decided to prime with Kilz Primer Spray took a couple of cans but it needed it.

Photobucket


Not bad. Time for paint. Lucky for me I had a half gallon of SwanWhite primer/paint in one left over from our daughters nursery so I decided that would be the base. I know didn't I just say I primed the unit well better to be safe than sorry! I had to put like 3 coats on that sucker though. Hmmm maybe next time I'll just spend the time to sand it down...hahaha next time (dont think so!) I also was smart in that since I used the white as primer and white I only had to buy a sample container of blue paint for the backsplash!! its like less than 3bucks!!! And the backing on the original unit was that cardboard. I needed some plywood. Enter in another coworker Colette who donated two big pieces of plywood!!! See all done with the main paint!

Photobucket


Just as I was getting all the paint done Ikea Centennial was OPENING! Whoohoo that means all the handles I needed and knobs I needed would be cheap and easily available. So I bought 2 sets of handles two for the bottom cabinets ($4.99) and oven and a set for the fridge ($7.99) Than finally the knobs for the stove top ($1.99) and lastly the "faucet" I dragged my friend Stephanie and she helped me look all over ikea for something that resembled a faucet and at the very end we found a Garage hook that upside down was the perfect sized faucet. Whopping price $0.99!
Total of $16 at ikea for the kitchen!

Hardware was coming together nicely now for the decorating. I needed curtains. But I was not going to get big curtains and cutting them down. Instead another talented and crafty coworker of mine (Jeanne) sews a lot and offered her sewing skills to me. All I had to do was buy fabric. I ended up only needed one yard of fabric at JoAnnes for $4.00! The fabric was perfect it had lots of little "kitchen" items on it. I found the pattern and directions on a fellow blog The Crafting Chicks. Perfection to cover the space underneath the sink to cover the metal mixing bowl. All I needed was a tension rod to fit the space (Lowe's for $2.99) She also used the leftover fabric to make two small tieback curtains for the faux window. The other pieces of fabric used she already had and it matched perfectly. I'd like to also add this was my first time in a fabric store looking at fabric and it was like a kid in a candy store. Ayden was with me and picked his own fabric for his apron and hat (coming soon). Also the oven door I needed plexi glass for, pshhh i found an old frame i didnt want any more and used the plexi glass from that and had my husband score it down to size!

I needed "burners" and found at the dollar store these red cup coasters perfect for burners!! I also found food shaped sponges for the sink there too! Yay $2 I decided to paint on a faux flat top stove and just glued on the burners. Paint again left over from another project of mine. Helps to be crafty folks.

Photobucket


Photobucket


Photobucket


Whala Ayden loves it! Why wouldn't he. I wish my kitchen could look that awesome ;)

Photobucket


Lets run down the costs....

Entertainment center = Free
Sink = Free
Backing to unit = Free
Primer = $15.00
Paint = $3.00
Curtains = $4.00
Faucet = $1.00
Handles/knobs = $15.00
Burners/sponges = $2.00
Tension rod = $3.00
Sealant = $10.00

$53.00!!!!

Yes lots of man hours were put into this but it was a complete labor of love. I mean is it picture perfect maybe not but is it perfect for my kids heck yes! My neighbors all were like wow this crazy lady is dedicated to this white thing in her garage. Little did they know it would be this cool. Pretty sure my husband was hoping I'd give up half way through since it took up my garage for a month! It was all worth it. Anytime anyone comes over that hasn't seen his kitchen he drags into his play area and shows them ALL his goodies. All thats left is a play dinning set since Grandma gave him a dinning table/homework table. The fact of the matter is this. If I can do it you can do it too!

Notes if you do it:

Don't rush it. Rushing it costs you more money! I took my sweet time with this finding the right parts and you know what so many people were excited to help me. They were more than willing to come over and help and let me borrow tools etc. All i did was provide the food. Ask around for stuff and you'll be surprised how many people want to give you stuff that doesnt. The labor parts like cutting the hole I left to someone more experienced with a jigsaw and that worked out well. I let my husband bash out the glass after taping with ductape (to hold all the tiny pieces. Posted it on facebook and got fabulous comments.
Related Posts Plugin for WordPress, Blogger...